3 EDO DRAM Memory Chips
4 BIOS
5 Graphics controller
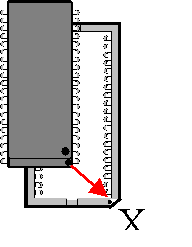
6 Sockets for DRAM Memory Upgrade (X)
7 S-Video Output (SVHS) (Mini-DIN 4)
8 Composite Video Output (Cinch)
Stealth 3D 2000 Pro
Technical Details
Memory Upgrade
High Performance Graphics Accelerator
Optimised 2D Acceleration
Optimised 3D Acceleration
Video
TV output
BIOS
Graphics Driver for
Additional Software for Windows® 95
Additional Software for Windows® 3.1x
Additional Software for Windows NTTM 4.0
Additional Driver for DOS
|
|
|
| ||||||||
|
|
|
|
|
|
|
|
|
|
|
|
|
|
|
|
|
|
|
|
|
|
|
|
|
|
|
|
|
|
|
|
|
|
|
|
|
|
|
|
|
|
|
|
|
|
|
|
|
|
|
|
|
|
|
|
|
|
|
|
|
|
|
|
|
|
|
|
|
|
|
|
|
|
|
|
|
|
|
|
|
|
|
|
|
|
|
|
|
|
|
|
|
|
|
|
|
|
|
|
|
|
|
|
|
|
|
|
|
|
|
|
|
|
|
|
|
|
|
|
|
|
|
|
|
|
|
|
|
|
|
|
|
|
|
|
|
|
|
|
|
|
|
|
|
|
|
|
|
|
|
|
|
|
|
|
|
|
|
|
|
|
|
|
|
|
|
|
|
|
|
|
|
|
|
|
|
|
|
|
Note: The chart represents modes supported in Windows® 95. All modes and refresh rates may not be available for other operating systems.
All values listed in the table are MB.
Importance of Memory Extension
Your Stealth 3D 2000 PRO is fitted with 2 MB EDO-DRAM
or 4 MB EDO-DRAM. This memory size is adequate for many applications
on the market.
4 MB EDO-DRAM is recommended for higher resolutions, faster refresh
rates, and/or higher color depths, or, if you want or need z-buffering
(Direct-3D/Games).
Memory Expansion Modules
| Upgrade module: | 2 MB EDO-DRAM |
| Maximum video memory: | 4 MB EDO-DRAM |
Adding Memory
Warning!
Prevent static electric damage. Static
charges can cause severe damage to microcircuits, but here are
some easy ways to see that it doesn't happen:
Hold the graphics card by its edges only. Don't touch edge connectors
or exposed circuitry.
Leave cards in anti-static protective bags until ready to install
them in your computer.
If possible, ground your body when handling the cards. A metal
power supply in your computer is generally considered the best
place to ground yourself.
Do not place cards on a metal surface.
Make as few movements as possible to avoid building up static
electricity from your clothing, carpets and furniture.
Warning!
You must install either none, or all four memory upgrade chips. The board and your system will not function properly with a partially installed memory upgrade.
Step 1: Take the graphics card out of your computer, if it is already installed.
Step 2: Install the four memory upgrade chips to the designated
sockets on the graphics card - refer to the illustration.

| 1 DB-15 Monitor Connector2 TV Output Controller
3 EDO DRAM Memory Chips 4 BIOS 5 Graphics controller 6 Sockets for DRAM Memory Upgrade (X) 7 S-Video Output (SVHS) (Mini-DIN 4) 8 Composite Video Output (Cinch) | |
Step 3: Install the graphics card with the memory extension into your computer. Refer to Installing the Card.