Installing Your Monster Sound
Card and Drivers
Caution! Static charges can damage electronic components.
Ground yourself by touching the computer's metal case or back
bracket before handling any card. Handle plug-in cards by their
edges; do not touch components or connector contacts.
Monster Sound Card Installation
Note: Windows 95/98 should be installed and working
properly before you install your Monster Sound card. Monster
Sound works in conjunction with your existing legacy sound
card (Sound Blaster or Sound Blaster compatible) so you do
not need to remove it.
- Switch off and unplug the system. Remove any cables,
taking note of which cables go to which connectors (you
may want to label the cables before disconnecting them).
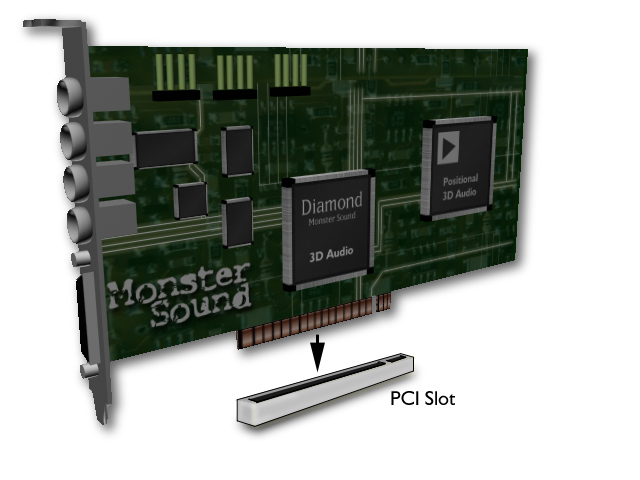
- Remove the computer cover and locate an available PCI
slot. Refer to your computer's User's Manual to confirm
the location of the PCI slots.
- Remove the blank end bracket from the back of the
computer aligned with the PCI slot you intend to use.
Remove and save the bracket and screw.
- Carefully insert the Monster Sound card into the PCI
slot. Make sure the edge connector is properly engaged
before pressing the card into place.
Note: Components on a PCI host adapter face
the opposite direction from those on other non-PCI
adapter cards you may have installed in your
computer.
- The bracket around the speaker connections will fit where
the blank end bracket was removed. Now secure the card
with the screw.
- The Monster Sound card connects to your existing legacy
sound board if you choose to use them together
(recommended). Use the supplied Audio Cable and plug one
end into the Output or Line Out jack of the legacy sound
card and the other end into the Input jack on the Monster
Sound card. The flow arrows on the cable must face the
proper direction towards the Input jack on the Monster
Sound card.
- Attach the audio output cable from
your CD-ROM drive to the 4-pin CD connector on the
Monster Sound card.
- Replace and secure the computer cover and attach any
previously removed cables.
- Attach your speakers and/or headphones to the ouput
connector(s) on the Monster Sound card:
- One pair of speakers or headphones:
plug the device into the Output 1 connector
- Both speakers and headphones:
plug one device into Output 1 and the other into
Output 2
- Four speakers:
plug the front pair into Output 1 and the back
pair into Output 2
- Microphone or joystick device:
plug them into the proper connectors on the
Monster Sound card.
Click here for information on
connecting speakers and other devices to your Monster
Sound card.
- Turn on your system. As Windows 95/98 loads, it will
inform you that it has discovered a new PCI Multimedia
Device and will prompt you to load the appropriate
drivers.
Driver Installation
For Windows 95 Users:
- Select the option "Driver from disk provided by
hardware manufacturer" from the PCI Multimedia
Device dialog. Click OK.
- In the space "Copy manufacturers files from"
type D:\DRIVERS (or replace D: with the letter that
corresponds to your CD-ROM drive). You may also click on
the Browse button and navigate out to your CD-ROM.
- Windows 95 will now copy the Monster Sound driver files
to your hard drive.
- If you did not previously install the Monster Sound
utility, the Monster Sound setup program will
automatically start once Windows has finished booting.
Please see the Software
Installation section of this manual for more
information.
For Windows 95 OSR2 Users:
- Windows 95 will bring up the Update Driver Install
Wizard. Click Next, then click on Other
Locations.
- Insert the Monster Sound installation CD into your CD-ROM
drive. Set the path in the install window to D:\DRIVERS
(or replace D with the letter that corresponds to
your CD-ROM drive). You may also click on the Browse
button and navigate out to your CD-ROM.
- Click OK. The driver files will be copied to their
destination directories. If you are prompted for the "Monster
Sound Disk 1" select OK and re-enter D:\DRIVERS
in the "Copy files from" space (or
replace D with the letter that corresponds to your
CD-ROM drive).
- If you did not previously install the Monster Sound
Utility software, the Monster Sound setup program will
automatically start once Windows has finished booting.
Please see the Software
Installation Section of this manual for more
information.
Attaching Speakers and
Microphones to Your Monster Sound Card
Attach speakers, microphones, joysticks,
and other external audio devices to your Monster Sound card by
following the legend below:
| Output 1 = Amplified Front Speakers |
 |
| Output 2 = Amplified Optional Rear Speakers |
| Mic = Microphone |
| Line In = Other Audio Sources |
| Joystick/MIDI = Joystick or compatible gaming devices
or MIDI instruments. |
Using Monster Sound
with Sound Blaster compatible devices
- If you are playing DOS games in REAL MODE DOS or in a
Windows 95/98 DOS window, and you have a Sound
Blaster-compatible sound card, Monster Sound can work in
conjunction with your existing Sound Blaster-compatible
card. Do not enable the Sound Blaster Emulation feature.
- To connect your Sound Blaster-compatible sound card to
your Monster Sound card: plug one end of the pass-through
cable (provided) into the line-out or speaker jack of
your Sound Blaster-compatible sound card, and plug the
other end into the input jack of your Monster Sound card.
- If your CD-ROM audio is connected to your legacy sound
card, remove the CD-ROM Audio connector from the legacy
sound card jack and plug it into the Monster Sound
"CD" connection jack. To adjust the volume use
the Monster Sound mixer CD volume control.
Note: If the jack is physically incompatible
with this connector, leave the connector in the
legacy sound card. To adjust the volume for the CD
Audio, use your legacy sound card's CD Audio mixer
control, and the Monster Sound Line-In mixer volume
control. In this case Monster Sound CD volume control
will not control the CD volume. You may be able to
purchase the appropriate type of connector from a
local computer parts supplier. A Monster Sound with a
white connector uses a Panasonic type connector; a
Monster Sound with a black connector is an MPC type
connector.
- If you are playing DOS games in a Windows 95/98 DOS
window and you DO NOT have a Sound Blaster-compatible
sound card, check the Sound Blaster Emulation checkbox
when installing your Monster Sound software.
Note:
Monster Sound is a Windows
95/98 product,
and will not work by itself in REAL MODE DOS.